eOffice – How to work with eFile
A File is a collection of related records that comprises of Receipts, Noting, Drafts, References, and Linked Files.
1. Creating a new electronic file in eFile
Create New option under the Files section helps the user to create an Electronic File.
To create a New File user has to perform the following steps:
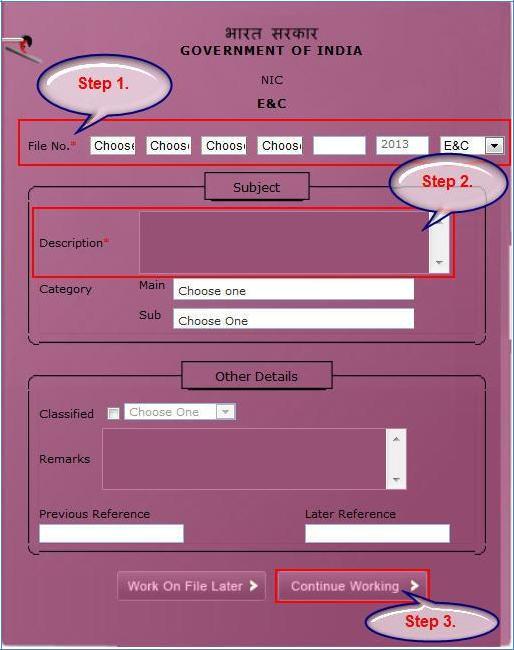
- Click on Create New option from the Left navigation panel under the File section, as a result, File Cover Page screen appears. Add File No.
- Enter the necessary details on the File Cover Page. Subject Description is a Mandatory field along with File No.
- After filling the necessary details, click the Continue Working button to create a new file.
As a result, file gets created, along with a unique file number based on the selection of heads.
User can perform 11 different operations on a file, for instance:
![]()
- Add Note → With the help of this feature user can add a green note or a yellow note onto the newly created file or existing File.
- Green Note: – Commonly used method for writing notes in a file. Green Note cannot modify/delete/cancel after the file is forwarded for further actions.
- Yellow Note: – Rarely used mechanism for writing note in a file. It is rough noting mechanism. The yellow note can be
Edited/Discarded/Confirmed. Once the yellow note gets confirmed, noting gets finalized and saved to main Green sheet noting of File.At a time only one noting is active, either yellow note or Main Green sheet note.
- Correspondence → With the help of this feature user can attach correspondence/ Receipt to the working File.
- Draft → With the help of this feature user can create New Draft and View existing Drafts in the File.
- Reference → With the help of this feature user can attach references corresponding to the working File.
- Link → With the help of this feature user can Link and delink other eFile(s) to the working file. It contains 2 sub links:
- Internal Files:- This sub link helps the user to link/delink any other file from within the Organisation
- Linked In Files:- This sub link helps the user to link/delink any other file from within the Organisation
- Details → With the help of this feature user can view the details file and also can view the total number of part files created.
- Movements → With the help of this feature user can have a track on the Running File and can view all the movements.
- Edit → With the help of this feature user can make changes to the cover page of existing running file except the Basic and corresponding Heads.
- Send → With the help of this feature user can send the File to the Recipient.
- More → With the help of this feature user can Park or Close the working file.
2. Sending the File for further actions
By clicking on Send option the user can send the created file to other user to work at a later stage. As a result, the following send window appears. By providing the user address in ‘To’ field (Mandatory) the user can send the file for further actions.
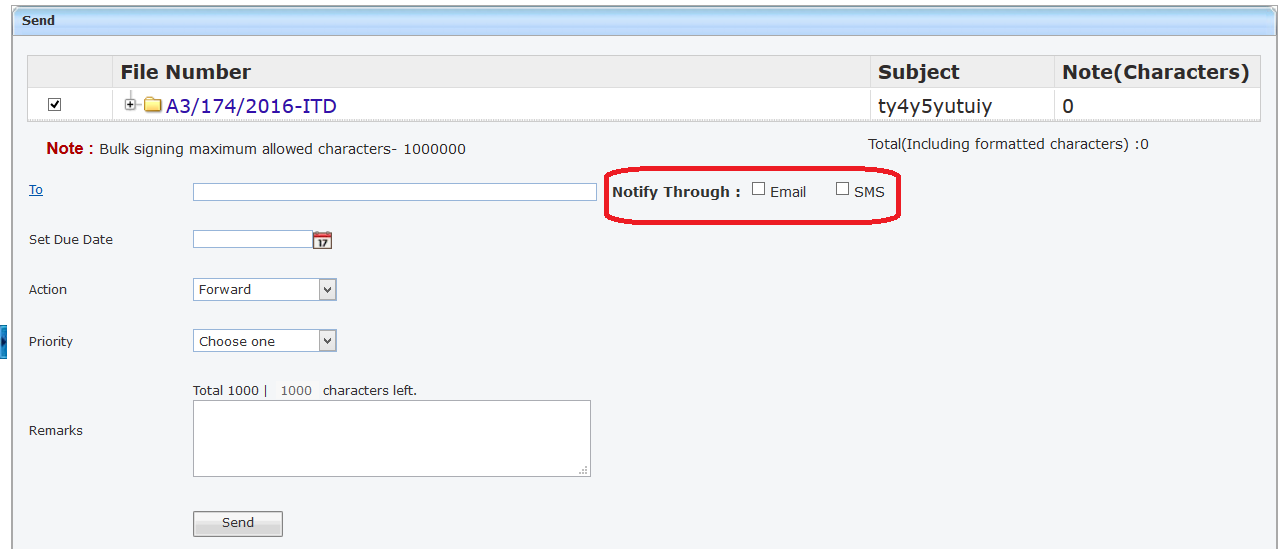 Set Due Date → Used to provide a due date indication to the recipient.
- Action → Indication given to the recipient what action has to performed on File
- Priority → The user can set the priority to process the File. (Immediate, Most Immediate, Out Today)
- Remarks → Remarks can be typed (if required) while sending the File.
All the above said entries are optional except ‘To’ field. The user can also provide a notification alert through email/sms to the recipient.
3. Inbox
Inbox option contains the list of all the Files that are received by the user for further actions. User has to click the File No. to view the Content of the file (Notes/Correspondence/Draft etc.). Character ‘E‘ symbolizes Electronic File whereas character ‘P‘ symbolizes Physical File.

4. Various actions performed in an electronic file
Users can perform 12 different operations on a file, which is opened from the inbox.
a. Writing Green Note
The user can use, ‘Add Green Note’ Button to write the green note in a file. User will be getting an editor with limited formatting tools, and can type the notes in English as well as in local regional language. The typed notes will be auto-saved.
b. Writing Yellow Note
The user can use ‘Add Yellow Note’ Button to write the yellow note in a file. User will be getting an editor with limited formatting tools, and can type the notes in English as well as in local regional language. The typed notes will be
auto-saved.
c. Viewing the previous note
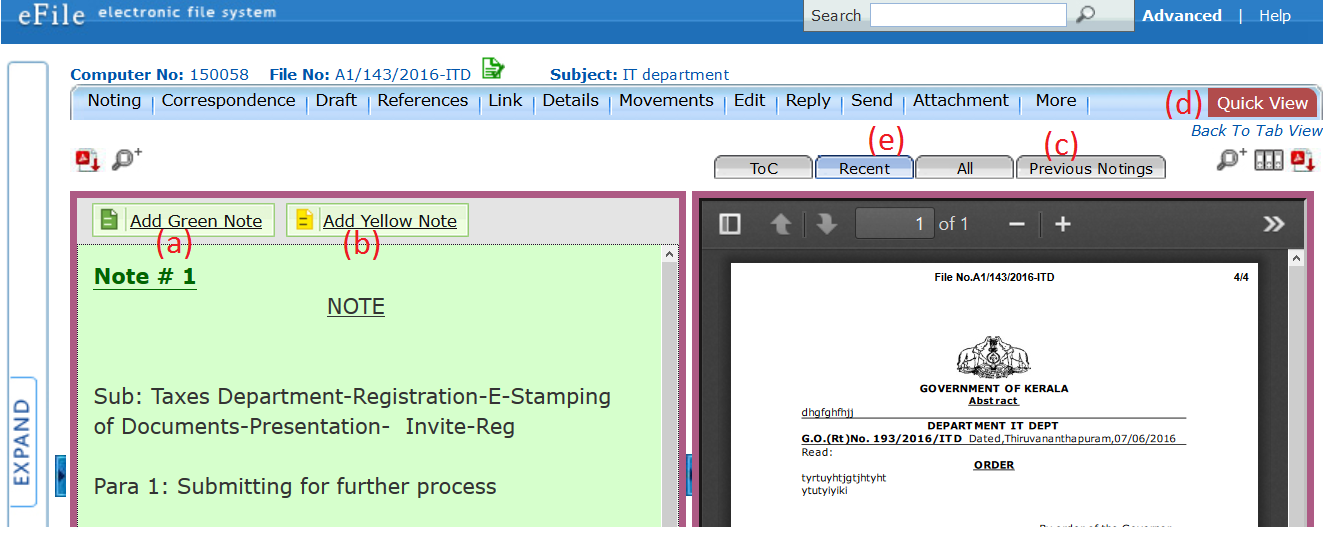
While typing the new note (green/yellow) in file the user can view the previous notes of the file by clicking on the ‘Previous Notings’ Button.
d. Quick view button
By using this tool the user can view the Correspondence/ Draft/Previous Notes of the file in a separate window while typing the new note (green/Yellow). A convenient mechanism to view the file’s Note, correspondence, and Draft simultaneously.
e. TOC / Recent / All
TOC → Table of Content of Correspondence/Issues in the File. (List view)
Recent → This options shows the recently attached Correspondence/Issues in the File.
All → This option shows all the Correspondence/Issues in the File
5. Creating a new Draft in a File
To create a new draft in a file first the user has to open the concerned file and chose the link Draft → Create new Draft; as a result, the following window with a word editor will be opened and then perform the following steps.
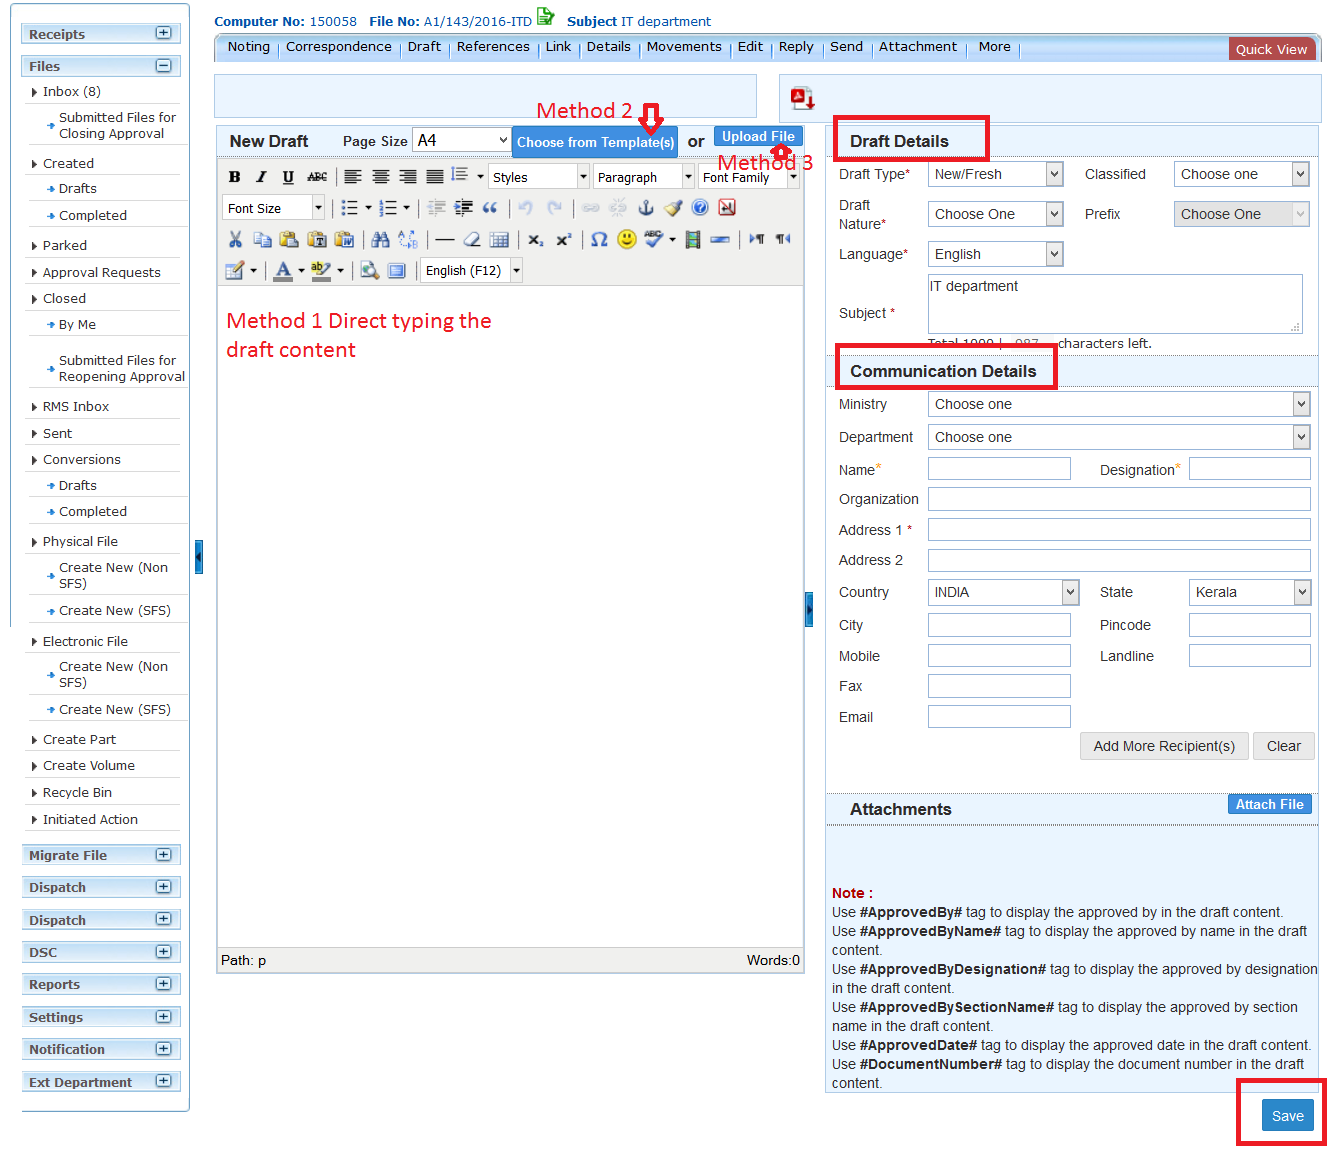
- Provide the Meta data about the draft by entering the entire mandatory field in ‘Draft details‘ and ‘Communication details’ category.
- The user can prepare the draft by opting any one of the three methods available
- Directly typing the draft content in editor itself
- Choose the draft template from the ‘Choose From Template’ option and add the draft content in it.
- Use the ‘Upload File’ option to upload the draft file prepared separately by using Microsoft Word / Open Office word
processing applications.
- Click on ‘Save‘ Button to save the draft. (Draft’s are not auto-saved like notes)
The user can use ‘Quick View’ option to view the notes file/correspondence file/other drafts in file while preparing the draft.
To attach any other supporting document along with draft the user can use ‘Attach File’ option.
5. Approving and dispatching the draft
To approve a draft in file the authorised user has to open the concerned file first. Then by using link ‘Draft → View draft’ the user can open the draft by clicking on the draft No. As a result the user can view the draft content and the Metadata about the draft in the following screen.
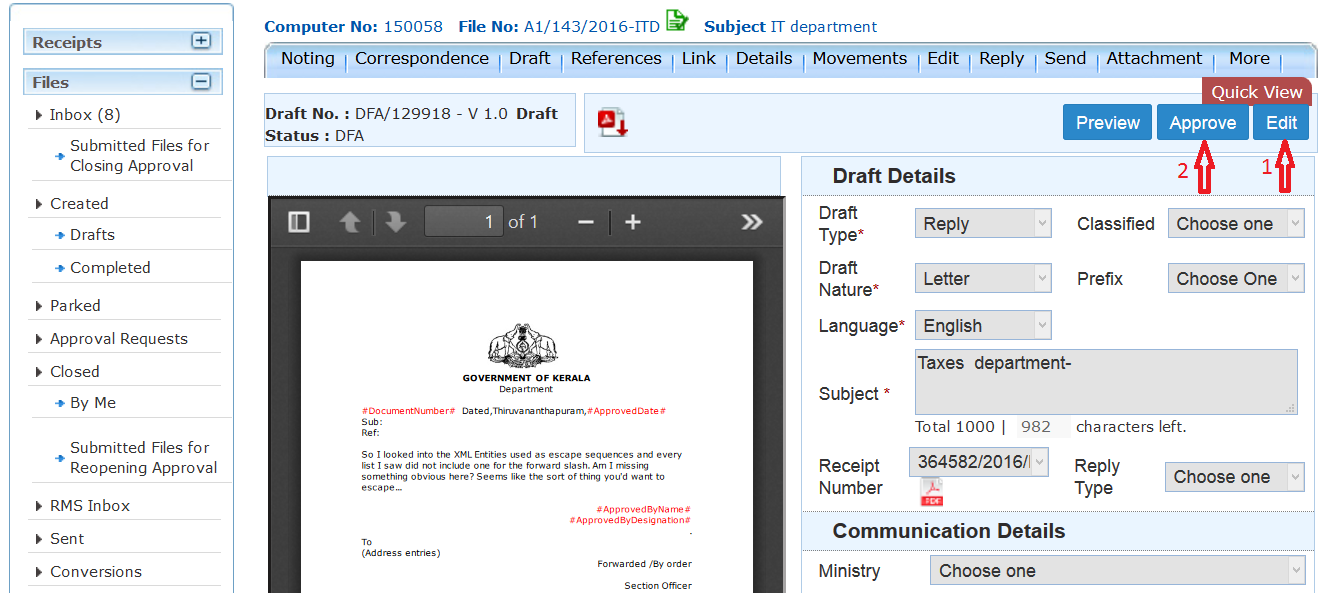
1. The user can use ‘Edit‘ button to edit the draft content as well as the Meta data about the draft before approving if necessary. The user can use ‘Quick View’ option to view the notes file/correspondence file/other drafts in file while editing the draft content. If the draft‟s get edited the user can use the ‘Save‘ Button save the draft.
2. By clicking on the ‘Approve’ button the user can approve the draft. Once the draft gets approved no further change can be possible in the approved draft.
An approved draft can be dispatched. As result, the user will be getting a dispatched window as follows.
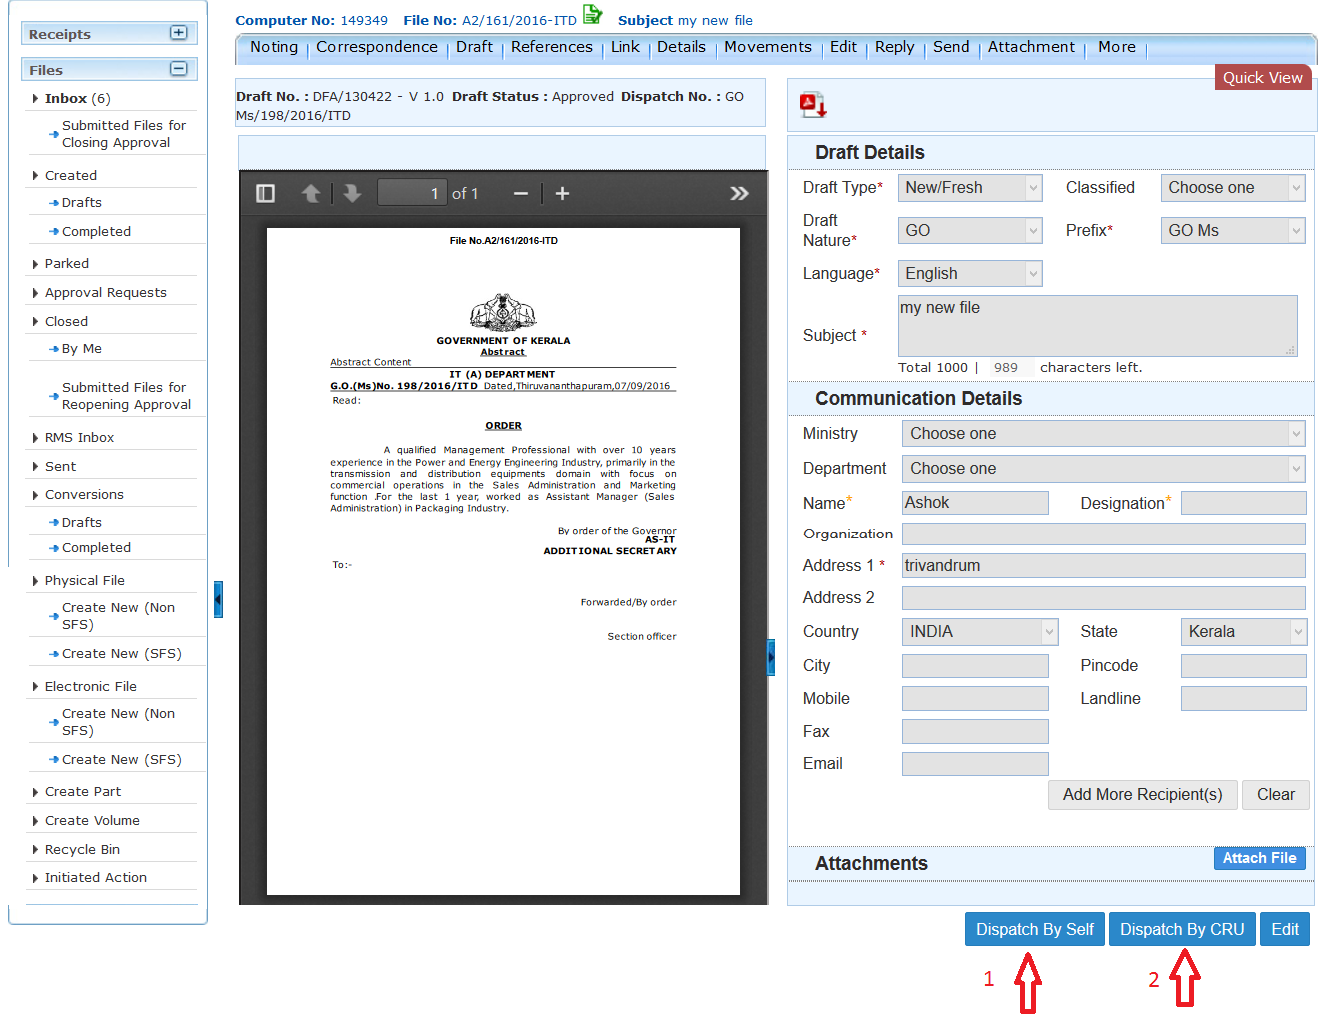
1. Dispatch by Self → The user can self Dispatch the approved draft
2. Dispatch by CRU → The user can dispatch the approved draft through CRU (Central Registry Unit/Dispatch section).
6. Closing a file
To close a file the user can use the close option from the ‘More‘ Link.
More → Close File → Close
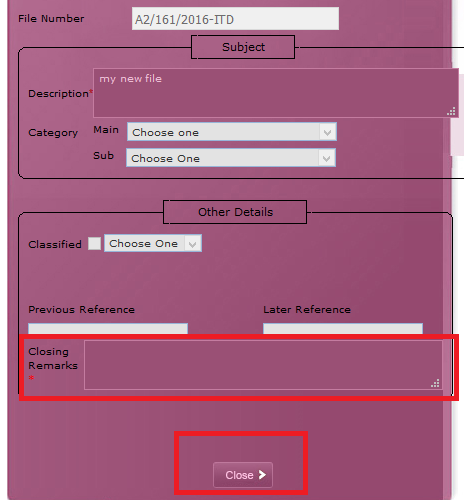
After providing the closing remarks the user can ‘Close’ button to close the file.
7. Linking and Attaching of Files/Receipts
Link a File
In eOffice, a file can be linked to another file (may be AD file or the section file itself). While linking, a copy of the file is attached to the corresponding file and not the original file. The original file remains in the Inbox itself.
Open the file from inbox list by clicking on file No. which is to be processed by linking another file. Then perform the following steps.
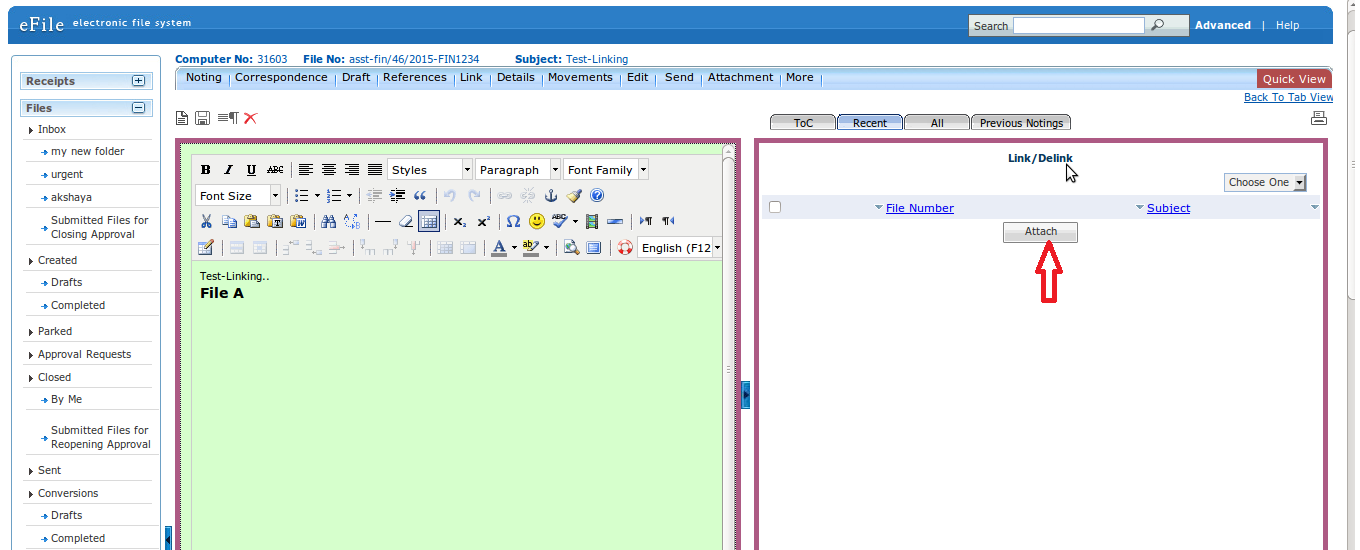
1. Click on option Link
2. Choose the first option “Internal files”
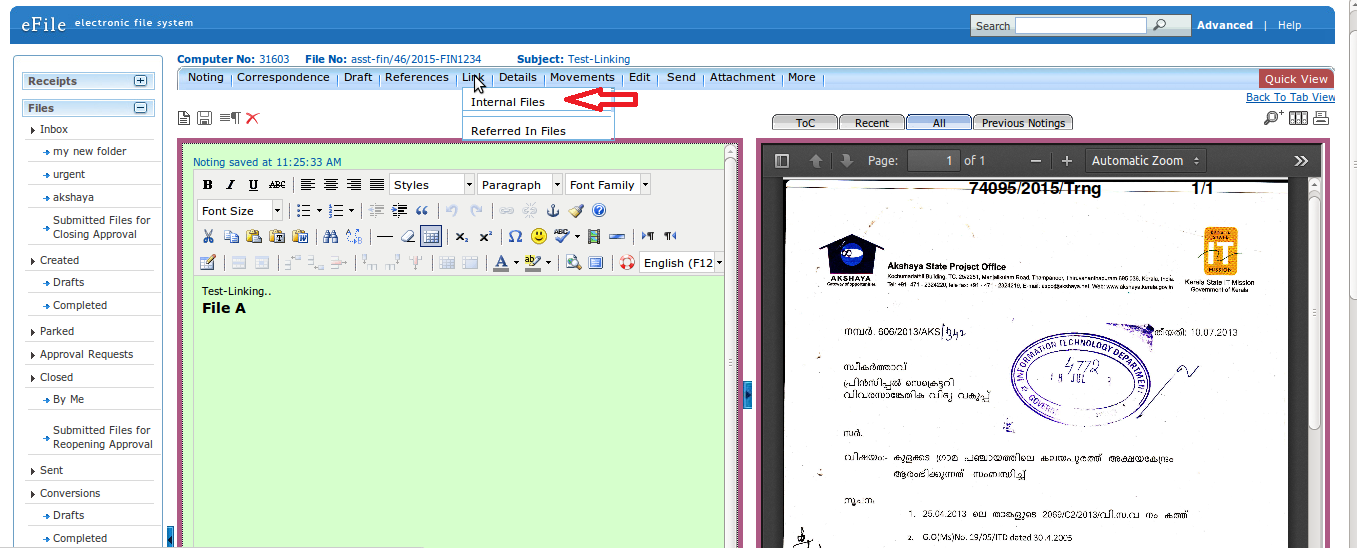
3. A new window (Link/Delink) appears on the right side. Click on ‘Attach‘
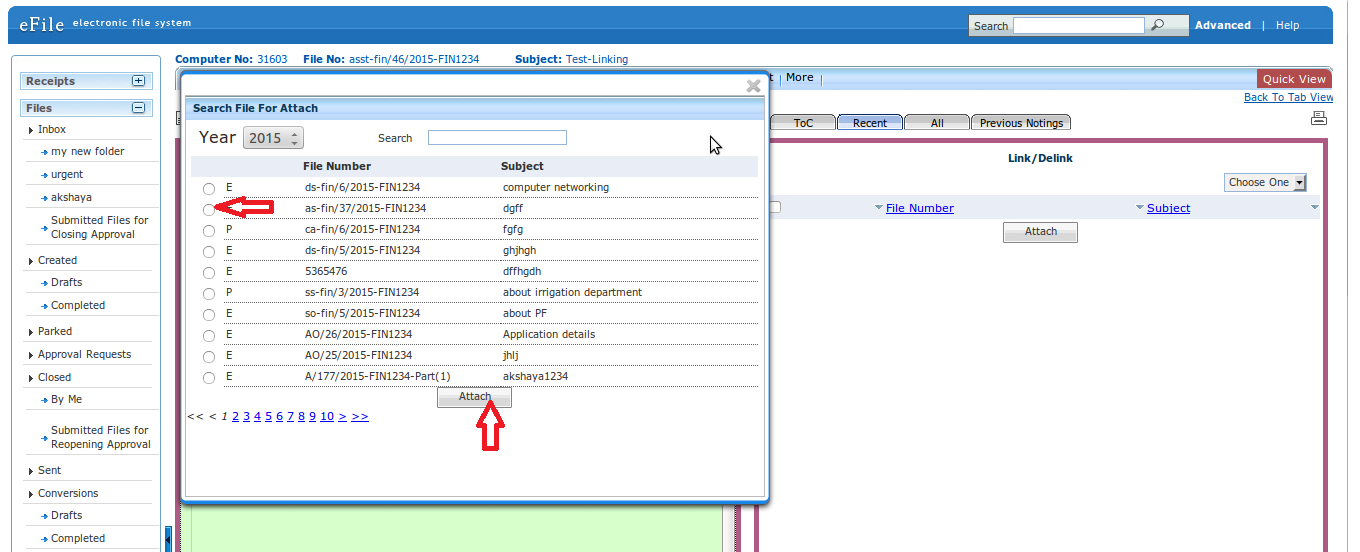
4. Select the file which is to be linked from the list of files which are there in your ‘inbox’ or ‘completed’ folders displayed in the new window.
5. Then Click on ‘Attach‘ Button.
6. The list of Linked files is shown in right hand side with file nos.
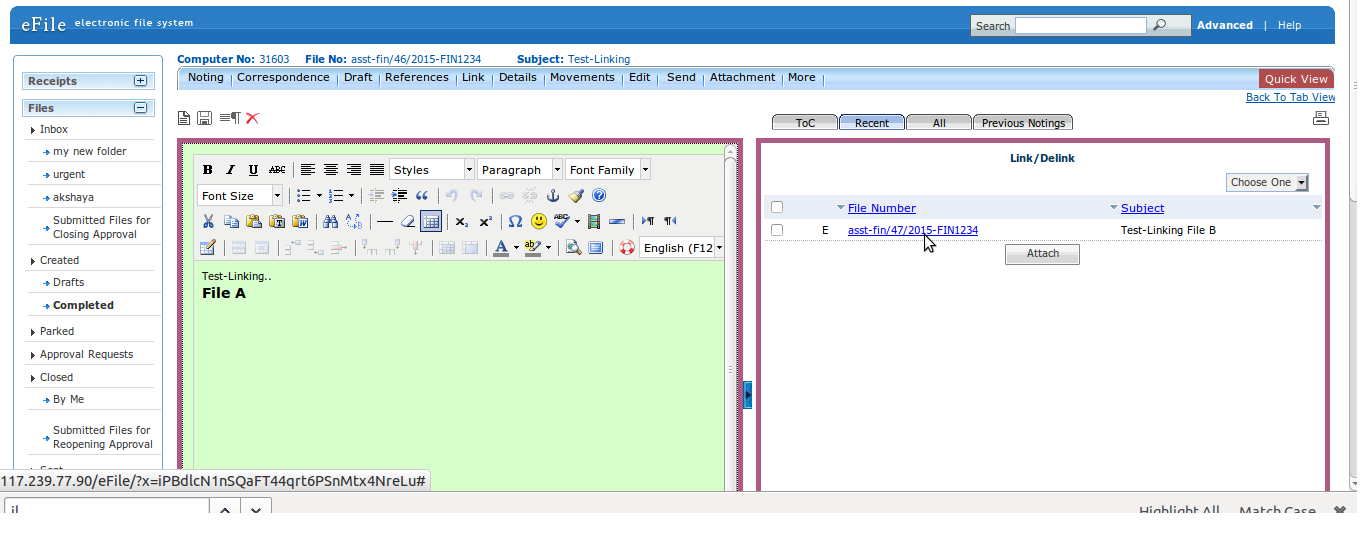
7. linked file can be viewed in read-only mode in a new window by clicking on the file no.
Delink a File
Open the file from inbox list by clicking on file No. Then perform the following steps:
-
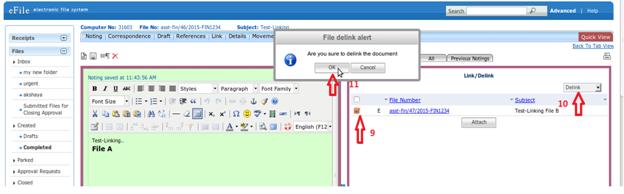
- Click on option Link
- Choose the first option ‘Internal files’
- Click the check box near the file number
- From the “Choose one” option select Delink
- A confirmation message appears and click ‘OK’ to delink the file
Attach a File
Attach file mechanism can be used to process a transfer file from one section to another section or it can be used to process a reference file coming from another department. The original file will be attached to the routine file when the users do this process. The attached file should be detached to close the routine file.
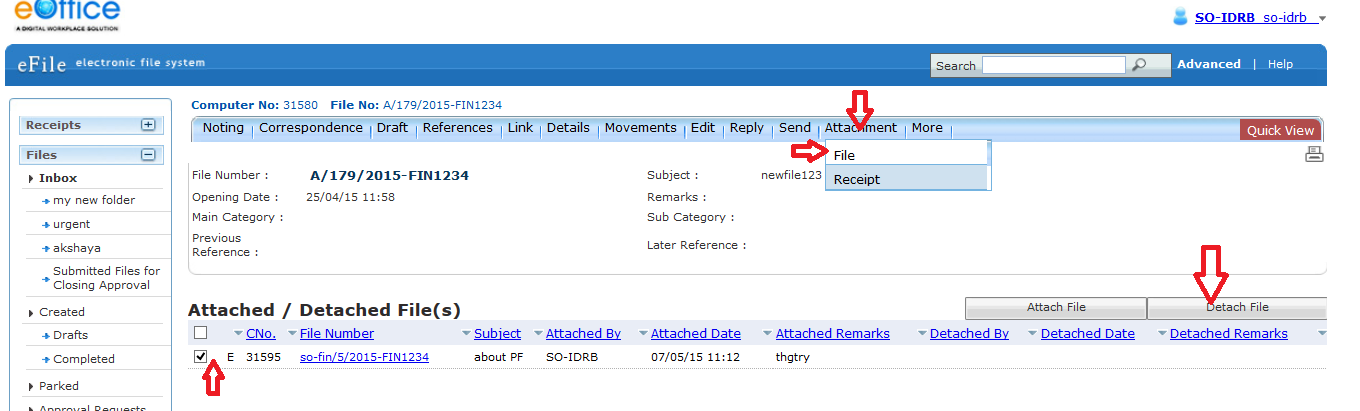
1. After Opening the routine file, click on the option Attachment → File
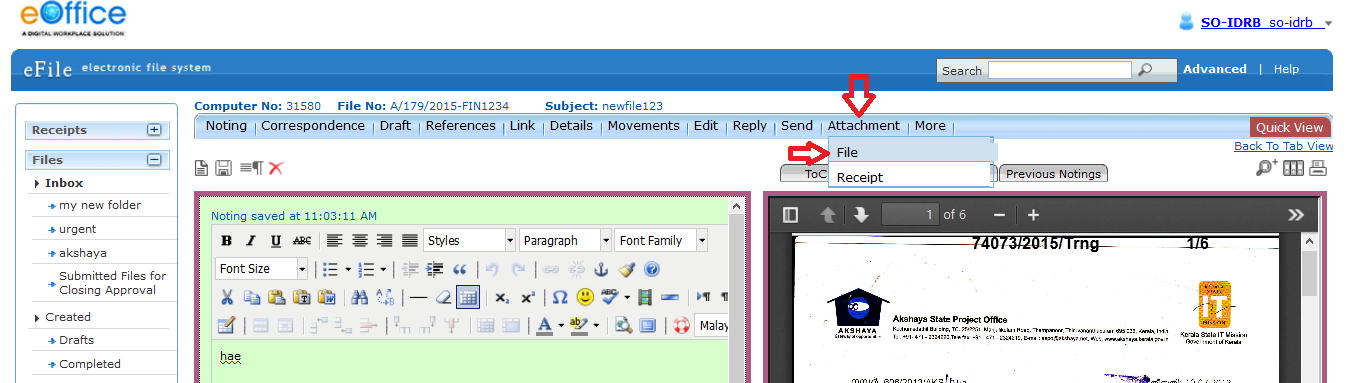
2. Click on Attach File
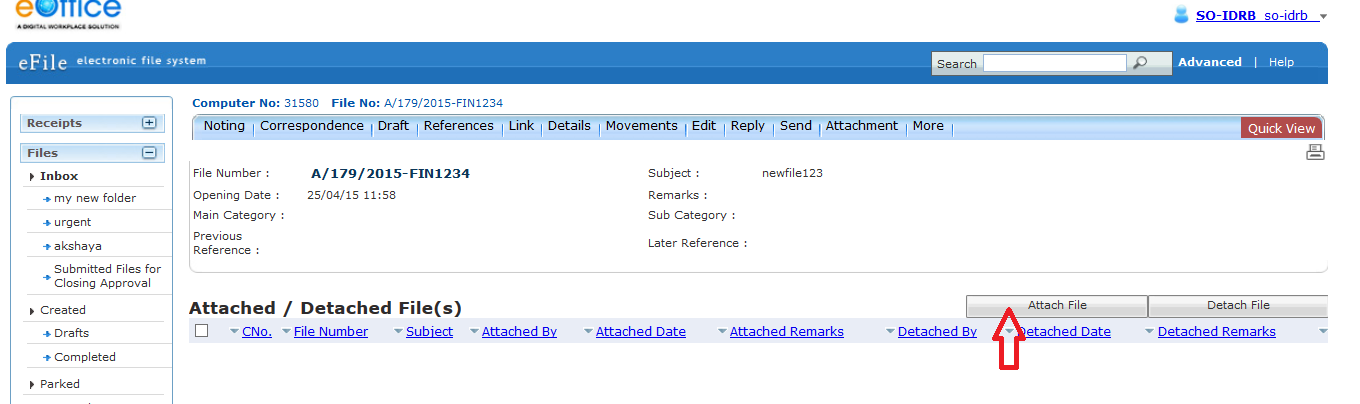
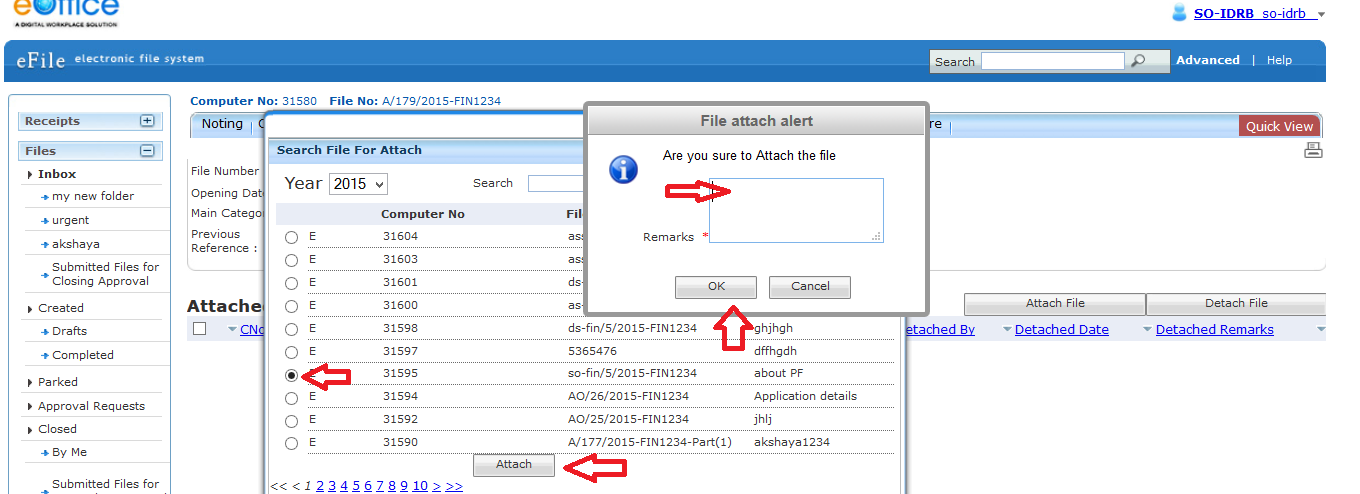
3. Select the file to be attached from the list and click on Attach button, give the remark and click OK.
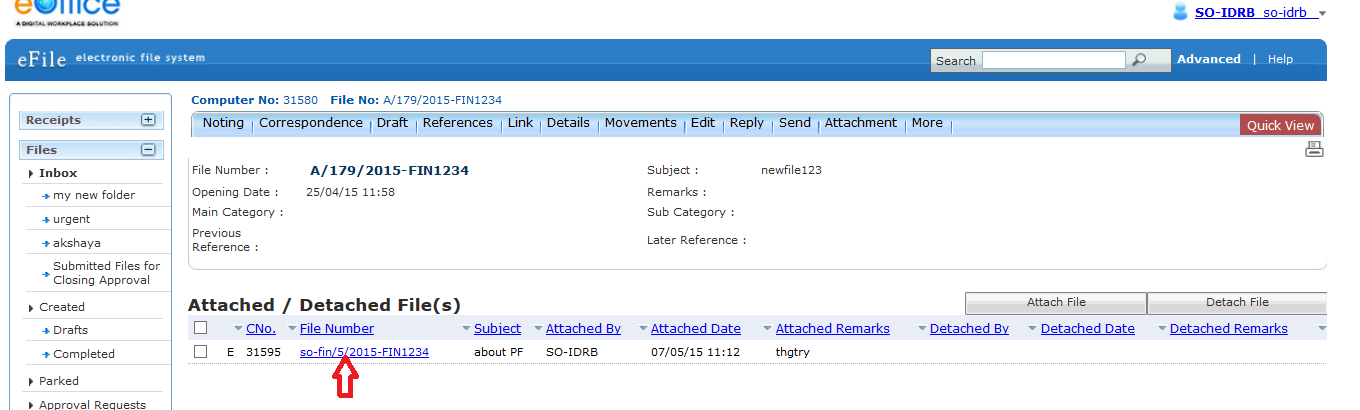
4. The attached file’s details will be listed as shown below. The file can be opened in a separate window in read-only mode by clicking on file no.
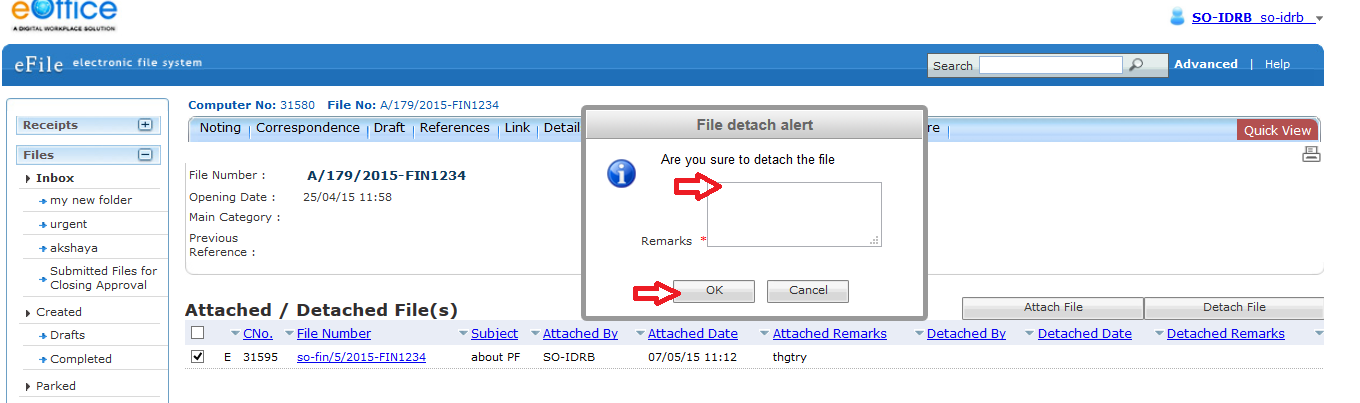
Detach a File
1. After opening the file click on Attachment ->File, Select the file to be detached from the list and click detach File.
2. Give the remark and click ok. The detached file be stored back in the inbox.
📢 Stay Updated with GConnect
Join our Whatsapp channels for the latest news and job updates:
Join GConnect News Join GConnect Jobs
GConnect News

GConnect Jobs